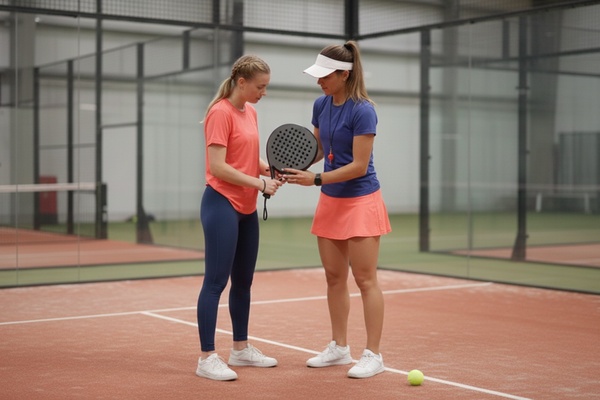
Your first padel lesson should focus on a handful of basics: how the court and scoring work, how to hold the racket, a simple ready position, and the two or three groundstrokes you'll actually use in your very first rally. Everything else, smashes, walls, fancy overheads, can wait. Trying to learn too much at once is the most common reason beginners leave their first lesson more confused than excited.
This guide walks through exactly what to prioritize in a first padel lesson, what to skip for later, and a few common mistakes that make that first hour harder than it needs to be.
What to Expect From Your First Padel Lesson
A good first lesson usually spends more time on positioning and contact than on power or technique. Most coaches start with basic rallying from the baseline, since it lets you get a feel for the smaller court and the livelier ball before introducing anything more complex. Don't expect to cover serving, volleys, and wall play all in one session, one solid lesson usually covers two or three of the basics below, not all of them.
Priority 1: Understanding the Court and Basic Rules
Court Size and Walls
A padel court is enclosed by glass and mesh walls and is significantly smaller than a tennis court, which is exactly why the ball moves differently than most beginners expect. Knowing that the ball can bounce off the back and side walls and still be in play is one of the first things worth understanding, even if you won't use wall shots yet.
Serving Basics
Padel serves are hit underarm, below waist height, after one bounce, diagonally into the opposite service box. This is very different from a tennis serve, and it's usually one of the easiest parts of the game for complete beginners to pick up quickly, since there's no need for the big overhead motion tennis requires.
Note
You don't need to memorize every rule in your first lesson. Focus on court boundaries, the serve, and basic scoring, the rest becomes clear naturally as you play more.

Free tournament generator — Americano, Mexicano and more. Set it up in minutes.
Priority 2: Grip and Ready Position
Most coaches teach a continental grip early on, since it works reasonably well across forehands, backhands, and volleys without needing to switch your hand position mid-point. Alongside the grip, a simple ready position, knees slightly bent, racket up in front of you, weight on the balls of your feet, gives you a stable starting point before every shot.
Priority 3: Forehand and Backhand Groundstrokes
Your first lesson should give you enough of a forehand and backhand to sustain a short rally from the baseline. At this stage, the goal isn't power or spin, it's making clean, controlled contact and getting the ball back over the net consistently. Coaches often feed easy, predictable balls at this point specifically so you can focus on technique rather than reacting to a difficult shot.
Important
Resist the urge to swing hard in your first lesson. A slower, more controlled swing builds the timing and contact point you'll need before power becomes useful.

Priority 4: A Basic Volley at the Net
Padel is played much closer to the net than tennis, so even a first lesson usually introduces a simple volley: a short, compact punch at the ball before it bounces, hit from near the net. You won't be expected to master net play right away, but understanding that padel rewards getting to the net, unlike a purely baseline sport, sets useful expectations for how the game is actually played.
Priority 5: A Light Introduction to the Walls
Many first lessons include a brief, low-pressure introduction to playing a ball off the back wall, since it's such a core part of padel. You're not expected to read tricky bounces yet, just to get a feel for how a ball rebounds off glass compared to bouncing only on the court, which is unlike anything most beginners have experienced in another sport.
| Priority | What to Focus On |
|---|---|
| 1. Rules and Court | Boundaries, wall play basics, how to serve |
| 2. Grip and Stance | Continental grip, ready position |
| 3. Groundstrokes | Basic forehand and backhand for short rallies |
| 4. Volleys | A simple punch volley near the net |
| 5. Walls | A light feel for how the ball rebounds off glass |
Group Lessons vs Private Lessons for Beginners
Since padel is played in doubles, group lessons with three other beginners can actually mirror real match situations better than a one-on-one private lesson. That said, a private lesson gives a coach more time to correct your grip and swing individually, which can be worth it if you're serious about building clean technique from the start. Neither option is wrong, it mostly comes down to whether you learn better with more individual feedback or more realistic playing time.
How Long Should a First Lesson Last
Most first lessons run somewhere between 45 minutes and an hour, which is usually enough time to introduce grip, stance, and basic rallying without exhausting a total beginner. Padel involves more sudden stops, starts, and direction changes than people expect from watching it, so don't be surprised if you feel more tired afterward than the pace of the rallies would suggest.
What Not to Worry About Yet
Shots like the bandeja, the vibora, and the smash are exciting to watch, but they're not first-lesson material. These shots depend on timing and positioning skills that take time to develop, and trying to learn them before you're comfortable with a basic groundstroke usually just builds bad habits you'll need to fix later. Save them for once rallying and basic net play feel natural.
Common Mistakes Beginners Make in Their First Lesson
Trying to Hit Every Ball Hard
New players often swing at full power from the very first ball, which usually leads to mishits and frustration. A controlled, moderate swing builds the consistency that power depends on later.
Standing Too Far From the Net
Padel rewards positioning closer to the net than many beginners expect, especially compared to tennis instincts. Getting comfortable moving forward, not just staying back at the baseline, is worth starting early, even in a first lesson.
Overthinking the Rules
Padel has some rule quirks around wall play and scoring that don't need to be fully understood on day one. Trying to memorize everything before you've hit a single ball just adds unnecessary pressure to a lesson that should be mostly about movement and contact.
Comparing Yourself to Experienced Players
It's easy to feel discouraged watching more experienced players glide around the court while you're still figuring out basic contact. Padel's learning curve is famously friendly, most beginners feel noticeably more comfortable after just a handful of sessions, so a slow-feeling first lesson isn't a sign you won't improve quickly.
Advice
Ask your coach to slow down feeds rather than speed them up if you're struggling. A slower ball with more time to prepare builds cleaner technique than rushing to keep up with pace you're not ready for yet.

What to Bring to Your First Lesson
Most clubs and coaches can lend you a racket and balls for a first lesson, so you don't need to buy equipment before trying the sport. Comfortable athletic shoes with good grip, workout clothes you can move freely in, and water are really all you need to get started. If you enjoy the lesson and want to keep playing, that's the right time to think about a racket of your own.
A first padel lesson works best when it stays focused: the court and basic rules, a simple grip and stance, a controlled forehand and backhand, an introductory volley, and a light feel for the walls. Everything more advanced will make far more sense once these basics feel comfortable, so there's no need to rush.