Not sure where to stand on court and which shot to play from there?
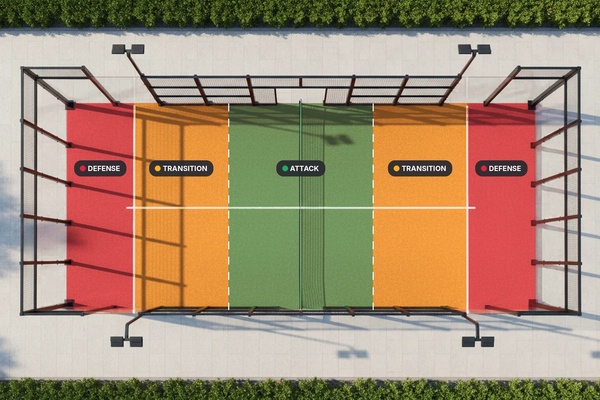
A padel court looks small, but it isn't uniform. Where you stand decides which shots make sense, how much risk you can take, and how likely you are to win the point. Coaches divide the court into zones for exactly that reason: the defensive zone at the back, the transition zone in the middle, and the attack zone at the net. Once you know what each zone is for, a lot of tactical decisions become automatic. This guide explains the padel court zones: where they are, what to do in each one, which shots fit, and how to move between them with your partner.

The Court at a Glance
A padel court is 10 meters wide and 20 meters long, split in half by a net. The net stands 88 centimeters high in the center and up to 92 centimeters at the posts. On each side, the service line runs parallel to the net at 6.95 meters, and that line is one of your most useful visual markers. The back walls are three-meter glass panels with mesh above, and the side walls combine glass and mesh.
| Zone | Where It Is | Main Job |
|---|---|---|
| Defensive (red) | Behind the service line, especially the last two meters before the back glass | Stay in the rally and reset the point |
| Transition (orange) | The middle of the court, between the service line area and the net zone | Pass through quickly, ideally together |
| Attack (green) | Near the net, roughly two to three meters back | Apply pressure and finish points |
Note
Different coaches draw the zone borders in slightly different places, and some split each zone into sub-zones. Treat the distances as guides, and use the lines and fence posts to help you place yourself.

The Defensive Zone: Stay in the Point
The defensive, or red, zone sits at the back of the court, usually within about two meters of the back glass. Here you're under pressure, and balls often arrive after bouncing off the back wall, which limits your options. Your priority isn't to win the point, it's to stay in it and create the conditions for moving forward.
- Best shots: high, deep lobs, controlled deep drives, and wall exits played in front of you.
- Mindset: safety before pace. Every attempt to accelerate from the red zone increases the risk of unforced errors.
- Goal: buy time with a lob, reposition your team, and work back toward the net together.
The Transition Zone: Pass Through, Don't Stop
The transition, or orange, zone covers the middle of the court. It's the area you cross to get from defense to attack, and it's the most awkward place to be caught. Balls arrive at your feet, you're too far from the net for an effective volley, and too close for comfortable groundstrokes. The rule is simple: move through it, never stop in it. Go forward to the net or retreat behind the service line, but don't hover in between.
There's one useful exception. Around the service line, where the center line forms a T with the service line, you can pause briefly to read the situation. From there you can step forward to volley, retreat to cover a lob, and reach balls on either side. Use it as a staging post, not a resting place.
Important
Time your movement so you're stopped and balanced, with a split step, at the moment your opponent hits, whichever zone you're in. Arriving mid-stride leaves you unable to react in any direction.

The Attack Zone: Control and Finish
Δοκιμάστε τις γνώσεις σας με το δωρεάν κουίζ μας για το πάντελ — γρήγορες ερωτήσεις, άμεσα αποτελέσματα.
The attack, or green, zone is near the net, roughly two to three meters back. It's the zone of dominance: from here you control the rally and finish points. The team at the net wins the majority of rallies in organized padel, so both players should aim to occupy it together whenever possible.
- Best shots: volleys, bandejas, viboras, and smashes.
- Mindset: pressure first, then finish. The closer you are to the net, the more risk you can take.
- Caution: placement matters. A poorly placed smash from the attack zone can hand your opponents a counterattack.
Which Shot for Which Zone?
| Zone | Best Shot | Intention |
|---|---|---|
| Defensive | Lob or high deep ball, wall exit | Buy time and reset |
| Transition | High ball at shoulder level or above: press cross-court or at the feet | Build pressure while moving through |
| Attack | Volley, bandeja, vibora, smash | Control the point and finish it |
Moving Between the Zones
The skill of the game is knowing when to change zones. You move forward after a shot that earns you time, such as a good lob or a soft ball at your opponents' feet. You retreat when a lob beats you or when your opponents hold the net. In both cases, you and your partner move together, staying level with each other so no gap opens in the middle. A split pair, with one player forward and one back, is the weakest formation on the court.
Reading Your Zone From the Court Markings
You don't need to measure anything. The service line is your first reference: standing behind it usually puts you in the defensive zone, and standing inside the service box puts you closer to the attack zone. The fence posts help too, since many coaches use the second post as a guide for a good net position. A glance at your feet relative to the lines tells you which zone you're in, and therefore which shots belong there.
Sub-Zones: Fine-Tuning Your Position
Some coaches go a step further and split the defensive and attack zones into sub-zones, with an ideal area, a cautious area, and a danger area in each. In defense, the best spot is further forward, closer to the service line, because balls are easier to handle there than when you're jammed against the back glass. In attack, the ideal spot is closest to the net, where you can volley down and take more risks. You don't need the exact distances to use the idea: simply try to defend from the front of the defensive zone and attack from as close to the net as you can safely get.
A Simple Way for Beginners to Use Zones
If all this feels like a lot, start with one question each time the ball leaves your racket: "Where am I, and where should I be?" If you're at the back, play a safe, deep ball and look for a chance to move up. If you're moving through the middle, keep going. If you're at the net, hold your position and stay level with your partner. That single habit covers most of what the zones are for.
Zone Drills
Zone Calls
A coach or partner calls "red," "orange," or "green" at random while you rally. Move to the matching zone and play the shot that belongs there.
Lob and Take the Net
Play a lob from the defensive zone, then move through the transition zone to the attack zone with your partner, stopping balanced with a split step.
T-Zone Pause
Practice pausing briefly around the service line, reading the opponents, then choosing to advance or retreat.
No-Stopping Rule Rally
Play points in which you lose the point if you stop in the transition zone while the ball is live. It builds the habit of passing through.
Common Mistakes
Stopping in the Middle
It leaves you exposed at your feet. Decide to go forward or back.
Attacking From the Back
Trying to finish from the defensive zone leads to unforced errors. Reset first.
Staying Back When You Could Move Up
Underusing the attack zone gives up the strongest position. Take the net when you've earned it.
Moving Alone
A split pair opens a gap. Change zones together.
Advice
Before each point, name your zone in your head: "I'm in red, so I'm resetting." The habit takes a second, and it quickly turns zones from a diagram into a way of making decisions.

The padel court zones come down to three jobs: reset from the defensive zone, pass through the transition zone, and press from the attack zone. Know where you are, play the shot that belongs there, and change zones together with your partner, and your decisions will get simpler and your points more consistent.